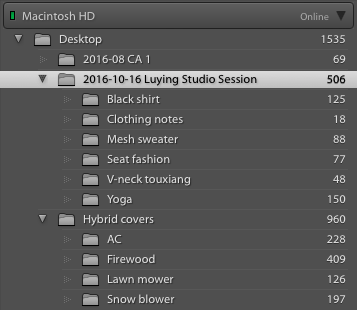
Adobe Lightroom: post-production workflow
Lightroom workflow after a shoot, marking approved and rating
When you work with a live model in boudoir photography, there are hard limits — like hunger, exhaustion and the 48-hour limit for reporting missing persons — to how long you can stay in the studio. (I feel sorry for still life and fine art photographers.) But there is no limit to how long post production can last. For perfectionists, this is a blessing and a curse. This article shows my system for how to stay on track and keep moving towards the goal. I show how to do this in a Lightroom-based workflow.
After the photoshoot is over, you are probably staring at a huge heap of photos like this:
Actually, our shoot had 1,000+ photos, so you are seeing this screen shot in the middle of the process.
Step one: focus on the goal
Repeat after me:
Your goal is to pick and enhance the best photos and get the client to accept them.
Step two: get client input first

Photographers have mixed opinions on whether you should allow a client/model see your raw shots before editing. Here are the considerations:
Let them see:
- Your client can communicate clearly which photos are most likely to be accepted
- You get a chance to ask them point blank about requirements they wouldn’t normally tell you
Don’t let them see:
- Your client might love a shot, but technically it can’t be used (out of focus), so they are disappointed
- Your client is horrified by how they look because everything is untouched
- Your client thinks you suck because the photos are untouched
- Your client thinks they will get 1,000+ beautiful photos as a result of the shoot after you “just touch them all up real quick”
For me let them see wins because it is the most direct path towards THE GOAL of picking the best photos. Here are specific tips to make this work:
- Make a development preset in Lightroom specifically for portraits and specifically for that camera. Enable profile corrections, profile chromatic aberration and noise reduction. Apply before the client sees.
- Clearly tell the client how many photos you promise and if you will you give them all the raw files.
- Make sure they know: some photos they pick just won’t work because of focus or other technical reasons.
Now here is the actual process. Use caps lock (auto advance) and have the model only select picks (P) if they absolutely love them and reject (X) if you should delete the photo. Do it in full screen or grid view and show the client how to go back and forth. Then step away.
We actually made a 6-button bluetooth keyboard that is fun and colorful and you can walk around with just for this purpose.

Just watch them and look carefully. This is your shot! Maybe your question is “did you pick that photo because your eyes look bigger?” If she giggles and gives you a nod — then you just saved about 4 hours of post-production retouching for photos she would not accept!
PROTIP: Flag and reject annotations are saved in your Lightroom catalog BUT NOT in your sidecar files. If you send photos to a third party for retouching or if you need to recreate your library you will lose this information. Don’t wory though, just read along with the next section.
Step three: categorize and rate all photos
This is a simple process and you should move forward in one fell swoop. Stay in Lightroom’s Library module. This is my rating system for photos:
- ⭐ — Delete this now
- ⭐⭐ — Low quality but may be accepted if we do something really creative (use auto-tone before marking anything below three stars, underexposed photos can lead to creative wins)
- ⭐⭐⭐ - Not touched up, but with think can be made acceptable
- ⭐⭐⭐⭐ — Touched up and is a candidate to send to the client
- ⭐⭐⭐⭐⭐ — Best photos we hope the client will accept during the next review
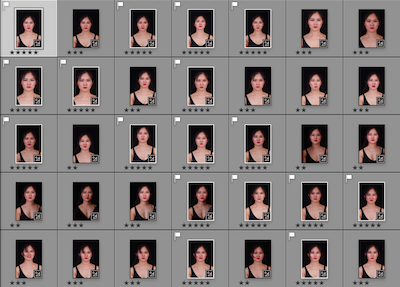
Your client picks are threes right away. And your client rejects are twos. Anything all black (after auto tone), out of focus, or unwanted nudity are ones. Delete ones immediately after each review! Use a library filter of zero-stars to focus on getting a quick rating on each photo!
PROTIP: If you did not rate 100+ photos in the first 10 minutes, you are going too slow. Try sorting the photos by reverse capture time, this will help you go faster!
Next, create folders for each outfit change or shot. Basically use a folder for any set of photos where if you don’t give the client something from that set they will be pissed.
Last, sort by rating and look at each folder. No threes in a folder? Be a little more forgiving.
Step four: do retouching
WARNING: For the love of god, do not start retouching before other steps are done.
Every photo is a precious snowflake. And with the infinite possibilities of non-destructive retouching you can devote a whole lifetime to editing a single photo.
PROTIP: If you look at two bad photos long enough you will begin to love one of them. Therefore avoid looking at the bad photos in the first place. See XKCD comic #915.
My full process for retouching boudoir portraits is in another post [ADD LINK HERE]. But each time you retouch a photo, remember your goal:
Enhance this photo and get the client to accept it.
If something about the photo will prevent the client from accepting it you need to STOP! (“The dress looks REALLY awesome, but her eyes are out of focus, maybe I can make them less blurry.”) There is a quote from a famous painter that I am probably butchering here (please help if you know it).
If parts of the face are in the wrong location it is better to throw away the painting than to continue adding detail.
Step five: the draft
Your deliverable to the client is a set of photos. There is no sense sending partial drafts, one-offs or works-in-progress.
Under no circumstances should you send a photo that you can’t make acceptable. You do NOT want to hear “oh my god I love this photo, I just need you to something you can't/won't do. Personally, I do NOT remove moles or marks and I do not reshape bodies (see my ethics and style). So if the photo has great eyes, smile, boobs and emotion; but the belly looks loose; and I know the client cares about that — then I CAN NOT send that photo!
Export the photos (full size, 94% quality JPG, name like YYYYMMDD-Client-OriginalFileNumber.jpg) and send it as a set. Personally I use Google Drive to share the folder. Also I use this command on Mac to make thumbnails all in one big contact sheet (because everyone previews on their phone):
montage -verbose -label '%f' -font Helvetica -pointsize 10 -background '#000000' -fill 'gray' -define jpeg:size=200x200 -geometry 200x200+2+2 -tile 4 -auto-orient -title 'MANDY 2016-05-22' *.jpg ~/Desktop/out.jpg
If the photos are very sensitive because of nudity, celebrities or whatever else, I am more careful. To be clear, we are talking about being afraid that your Google account is going to get attacked specifically because someone wants to steal your photos from this session. (iCloud was previously broken into exactly like that.) In this situation, I use encrypted ZIP files (on macOS Terminal use zip -er) and put that encrypted file again on Google Drive. Generate a good password (uuidgen). Text or hand them this password not using the same channel you used to send the encrypted file. (See my other post all about computer security [TODO: WRITE ARTICLE, ADD LINK HERE].) If you’re even reading this far you should probably just keep the photos offline (use Lightroom Classic) and physically meet the client to review your draft.
The point of each draft is… to get the client to accept it! Make sure it is a no-holds-barred attempt to get them to accept completion of your assignment.
But if they don’t accept it. Mark anything they “love” or “accept” as pick (P), and mark rejects (X). Go back to step four and either edit that reject (now you can remove the flag, U) or mark it four and then find a four to promote to five. Keep your head up and try again!
PROTIP: When you submit your next draft, send all photos again. Your deliverable is the complete set. This keeps your client from having the Joe Biden problem (did you see the comic above?)
You’re done
Now the client accepted your photos.
But first before you close this page… All your fives have been accepted, you can remove pick and reject flags. Archive your photos onto cold storage and set a reminder for any follow ups in your client workflow.
 Written by William Entriken 2016-11-03
with links to Randall Munroe.
Written by William Entriken 2016-11-03
with links to Randall Munroe.